Saturday, December 26, 2009

Grilled Skirt Steak Tacos with Roasted Red Peppers and Carmelized Onions


The first recipe that I've decided to take on from Rick Bayless's 'Mexico One Plate At A Time' was chosen because I picked up a 3 lb organic skirt steak from Saslove's Meat Market in the neighbourhood of Hintonburg in Ottawa, Ontario. I know that skirt steak is the prime cut for anything fajita, and I've even had it as a delicate and flavourful course at Joel Robuchon's L'Atelier so I know it is the meat to beat.
I found a recipe thanks to this blog....(add referen
ce).... and noticed that it was altered to suit the blogger-chef's needs so I thought that I could do the same since recipes are pretty much like open-source software

The recipe calls for poblanos, but in Ottawa, I didn't really have a source so I just went with a red pepper. They're flavourful when they're roasted anyway. I could already smell it in my head if that makes any sense. I also have lime juice on hand thanks to the day I juiced 20 limes, froze the juice in ice-cube trays and then vacuum sealed the cubes using a foodsaver.

Ingredients

Marinade
lime juice
cumin
garlic
onion
salt, pepper

Rajas (topping)
roasted red pepper
onion
cilantro
salt, pepper

Filling
skirt steak
marinade (above)

Vessel
corn tortillas

Condiments
sour cream
sharp cheddar
rajas (above)

Method

Marinate the meat. Combine oni
ons garlic, lime juice, cumin and 1/2 tsp s
alt in the food processor to puree. Add marinade to meat in a ziplock bag or plastic sealable container. Marinate it for no longer than 8 hours. I gave it a good 5 and it was full of flavour and the perfect texture.

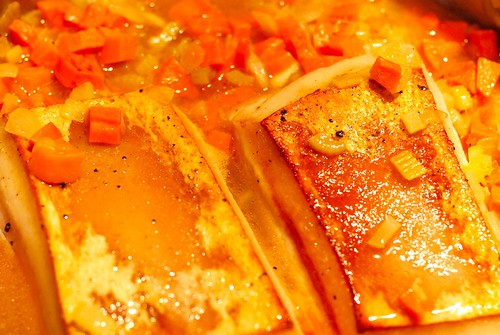
Creating the pepper and onion mixture or, according to Rick, rajas. Though he would have Poblano chilis. Those don't seem to be around Gatineau in December. Any pepper other than a green pepper will add tons of flav
our. Make sure it's not a green pepper. You're not making pizza here. Heat up a grill or put your oven on broil and place the pepper(s) a few inch
es away from the heat. Monitor it and turn it as the skin chars black. About 4-5 minutes each turn. Once the entire pepper has been charred, remove it, place it in a bowl and cover with plas
tic wrap to steam. 15 minutes later, remove all of the skin, the
stem, and seeds. Dice up the roasted pepper and place it into a bowl.
Slice up the onions and caramelize them. Use a cast iron skillet if you have one. If you don't, go frigging buy one as they are indispensable and will stay with you for LIFE! Lightly grease the pan, set it to med-low and add the onions when heated. Stir them until you see that they've softened and acquired a beautiful rich brown colour. If I had done this for 45 minutes, they would have been fit for pierogis.

Mix t
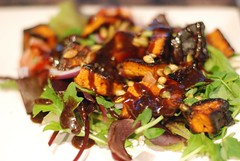
he onions with the roasted peppers, add some chopped cilantro, season with salt and pepper and you are ready to grill the meat!

Grilling the meat can be done either on a gas grill, a skillet or via oven broiling. I used a cast iron skillet with a grilled surface. I love the staggered charring effect. Remove the meat from the marinade and shake off whatever will drip off. Oil the meat or grill. Season the meat with salt and pepper. Place the meat over high heat. Turn it once after about 2 minutes or so. It depends on the thickness of your cut. Mine was pretty thick so I needed about 4 minutes a side. I was going for rare, as everyone should with a skirt steak. If you want to eat fully cooked red meat, have short ribs or a burger instead.

To serve the tacos, I used store bought corn tortillas for convenience, but if you want to take this further, make the corn tortillas yourself. I'll do that another time and blog it. For now, get some soft corn tortillas and heat them by either placing them in a dishcloth and steaming them, or put them in some foil in the oven at 350 for about 5-10 minutes. Slice the meat against the grain and then mix it in with the pepper-onion mixture. Place a portion in the warmed taco and add whatever condiments you'd like. We used a top-quality sour cream, sharp chedder, cilantro and some home made pickled jalepenos.

Bon appetit, or should I say, Buen apetito!

Cooking through Rick Bayless's 'Mexico: One Plate at a Time'


I've been a fan of mexican cuisine ever since my first taco night way back in early eighties. I discovered tacos at a friend's house when we used to have many eat-overs between the neighbourhood kids. I remember coming home excited to tell my mother that we have to make tacos! Considering that this was in Kingston, Ontario, tacos were really a product by Betty Crocker branded as Old El Paso.


On trips across the border to a town called Watertown, NY, I then discovered the more authentic mexican food of Taco Bell. I'm not lying when I say that I made specific trips to Watertown with some friends to specifically eat at Taco Bell. There was nothing like the Big Beef Burrito Supreme in our part of Canada.

Fast forward to today where I've been playing with mexican flavours for the last 10 years in the kitchen and every time I have learned something new. From enchiladas sauces to roasting my own cumin, I've given up on Old El Paso and I make my own taco season on-demand. My own chorizo, and I'm about to tackle the ultimate, my own Mole!

Anyone who's a fan of Top Chef would have definitely watched Top Chef Masters where actual top chef's battled in the kitchen to become THE Top Chef. I was amazed every time that I saw Rick Bayless on screen, talking with passion about food, flavours and his philosophies. I was inspired by him. He blew the judges away, along with his competitors with one dish, a Oaxacan mole. I realized that I had to learn this.

I became a follower of Rick Bayless on Twitter recently when I found a post of his on another blog. I sent him a tweet asking which of his books I should jump into to learn THE mole. He pointed me to 'Mexico One Plate At A Time' which I promptly ordered from Amazon and decided to crack it open over the christmas holidays, where I have the luxury of time to experiment and explore the flavours that Rick has documented within.

So I'm going to start sharing my adventures in this book on this blog since it sorely needs some content. If anyone would like to contribute with their versions of recipes from the book, Mexico: One Plate at a Time, please send me a message.


Monday, October 12, 2009

Joël Robuchon - MGM Grand, Las Vegas


While enjoying Joel Robuchon's more casual L'Atalier restaurant at the MGM Grand in Las Vegas only yesterday, we were invited to experience the flagship and 3 Michelin star property, self titled, Joel Robuchon.

We were treated to a corner booth table and thankfully so, not only could we see the action but also, we were seated for a 5 and a half hour culinary journey so the comfy velvet sofa was extremely appropriate.

Entering the restaurant, we were greeted by name. All the staff we encountered knew who we were and where we came from. What a nice touch, since there's no real reason they should know us from anyone else. You quickly come to realize that this was the start of many fine details that are carefully attended to. Love is in the details and Joel Robichon and his staff overlook nothing. Mike placed his napkin on the sofa while using the rest room and it was quickly replaced. The table was pulled out each and every time we needed to get up or return to the table. This was hand's down the most attentive staff I have ever experienced.

The ambiance is decadent. Deep purples, black, white and pops of orange. Gorgeous chandeliers, art, flooring, wall coverings and decor. Beautiful piano tunes played throughout the night and it was a nice reprieve from the dings and rings of the Vegas casino floors.

Onto the meal.

We were first presented with a bread cart with about 15 different kinds of bread offerings. We selected a brioche, an olive baguette and a bacon bread. The waiter then proceeded to carve off ribbons of fresh butter from a large block and sprinkled it with fluer de sel.


The Amuse Bouche was called Osetra Caviar on a coral gelée.

This was presented as though it were simply a jar of fine caviar, but digging into it revealed a layer of gelee and a luscious crab and creme freche layer. Of the many, many..... MANY courses to come, this one still remains one of my favorite of the night.

Course two was a moan-inducing carppaccio-style potato/frois gras/white truffle dish with what I deduced was a truffle vinaigrette. Finely julienned radishes garnished this beautiful plate.

Third course was actually three courses in one, a trio of mushrooms. Truffles and mushrooms on a thin crispy bread that absolutely tasted like perfection to me. My meal could have ended then and there and I'd have felt treated to a special experience. There was a bright green puree that I can't recall, but it was over a frois gras puree and topped with sliced mushrooms. Absolute heaven. The third version was a ginger tea with gold leaf and mushrooms that could be consumed as either tea or soup and the taste was right in between both. Very interesting and unique.

Fourth course (sorry no picture) was frogs legs served over a paella. Succulent pieces of scallop, shrimp and squid within perfectly al dente rice. Although this dish was amazing, we were quickly realizing that this meal is a marathon, not a sprint. That in order to complete the full service we needed to take a break. We requested 15 minutes between the 5th and 6th courses lest we explode.

Fifth course was again, three courses in one. This time showcasing shellfish. Rubichon's signature languastine ravioli with black truffle with a side of savoy cabbage and creme fresh was the stuff of genious. Absolutely wonderful. Second was lobster served on a lemongrass skewer on top of a green curry with what I think was fried finely sliced lemon grass. This Asian influence was a nice surprise, that would repeat itself later in the meal. The third offering on this plate was hands down, the bite of my evening, sea urchin over potato puree topped with foam and coffee. Had I been standing I may have fallen, it made me knees weak and I had to turn to the wall so no one in the restaurant could see my pleasure face.

Fifth course was a welcome reprieve, a nice light course of chestnut and frois grois velute finished with bacon foam. The break and the airiness of this dish set us straight and gave us the confidence to continue.Sixth course was pan fried sea bass with a lemon grass foam and stewed baby leeks. Beautifully presented and portioned with a zesty and refreshing flavour. Sorry about the photo of a half-eaten plate.

Seventh course was a melt-in-your-mouth sauteed veal chop accompanied by an intense herb gel that complimented the veal in such a surprising way. On the side was zucchini ribbons wrapped around whole pistashios topped with fried zucchini flower pedals. So simple but so exquisite.

Eighth course absolutely delighted me. The absolute genius of it made me giggle as I ate it. It was presented as a risotto, but a bite of it revealed that it wasn't made with arborio rice, but rather with bean sprouts, chopped to the size of rice and cooked to simulate the al dente tooth feel of a risotto. The creamy, mushroom sauce felt very risotto-like, but was beautifully light and refreshing in a way that traditional risotto isn't.

We were thrilled to have made it through the entire savoury portion of the meal and were anxious to move onto dessert.

Little did we realize that even dessert would be several courses!

Ninth course was a refreshingly sweet and beautifully presented. Cool mango, kiwi and other fruit topped with sorbet and gold leaf. Just what the full belly doctor ordered.The next dessert course (10th course) was a caramelized apple confit with vanilla creme freche and crispy morsels of pastry, crunchy goodness. It was like a deconstructed apple crisp. Wonderful.11th course was another cart presenting ice cream. Mike chose an unbelievably creamy vanilla ice cream and I chose a raspberry sorbet. (Sorry no picture). As we gladly gobbled down the ice cream, the 12th course arrived. A dessert cart from Heaven. Hand-made delectable treasures, the likes I couldn't even dream of. I requested the waitresses choice as long as it included some chocolate. She didn't disappoint. A variety of truffles and gelles were plated for us and we savoured them over an espresso and cappuccino.
As we were finishing up our 5.5 hour meal, I was presented with a Joel Rubichon colour photo book and a box of treats. See? Love is in the details. How nice!There is absolutely no restaurant that can compare to this. The food is of course genius, the ambiance is decadent, the service staff is attentive, professional and went above and beyond in every way. And if you're lucky enough to be there while Mr. Robochon is there, he'll make you feel the the most important guest he's had. Hospitality runs through his veins the way that truffles and frois gras run through his kitchen.

Here's hoping you get to have this experience in your life as well. Definitely add it to the "To-Do-Before-You-Die List."

Sunday, September 20, 2009

Duck Tartare


300 g duck breast
3 Tbsn Unripened goat cheese
1 Tbsn minced shallot
1 Tbsn minced scallion
1 Tbsn soy sauce
1 Tbsn canola oil
1 tsp truffle oil
1/2 tsp kosher salt
1 tsp black pepper

1. Using a sharp knife, remove all the connective tissue and excess fat from the duck breast. Cut into very small cubes and reserve.

2. Add the remianing ingredients to a medium bowl and mix well.

3. Add the duck to the marinade and combine.

4. Serve immediately or refrigerate for up to 1 hour.

Serve with crustini and salad.

Scallop Ceviche


12 large sea scallops
1/4 cup fresh lime juice
Zest of one lime
1/4 cup extra virgin olive oil
2 Tbsn minced cilantro root
2 shallots, sliced thinly
1 birds eye chili pepper (halved and seeded)
1 tsp sugar
1 tsp kosher salt

1. Rinse scallops in cold water and dry thoroughly. Remove the abductor muscle from each scallop and discard. Slice the scallops horizontally into 3-4 pieces.

2. In a medium bowl, combine the remaining ingredients. Mix well.

3. Add the scallops to the bowl and gently mix so that the scallops are evenly coated by the lime marinade.

Cover and refridgerate between 1-3 hours. Remove from marinade and serve.

Black Sesame Soy Vinagrette

Another of Chef Scott Adams' great dressings.

1 cup canola oil
1/4 cup rice vinegar
2 Tbsp Soy Sauce
1 1/2 tsp sesame oil
1 Tbsp honey
1/2 tsp minced ginger
1/2 tsp minced garlic
1 tsp black sesame seeds

Place all ingredients in a mason jar and shake to combine.

Truffle Vinaigrette

This recipe is by Chef Scott Adams of Benny's Bistro. Taught to us at a raw cooking class at Urban Element, Ottawa.

1 cup canola oil
1/4 cup white balsamic
1 Tbsp minced shallot
1 Tbsp dijon Mustard
1 Tbsp Truffle oil
1 tsp kosher salt
1/2 tsp black pepper

Place ingredients in a mason jars, shake well to combine.

Sunday, September 13, 2009

Pickled Jalapeño Peppers

When I think of the amount of canned pickled jalapeños (Escabeche) that I've bought over the years, and then look at how simple these are to make, how cheap this pepper is (approx $3/lb) at this time of year I get a little giddy at the thought of having them on hand at all times. Thanks to this wonderful post on Simply Recipes, I now know the fundamental recipe for jarring my own.


I've made 2 batches and they are honestly better than any pickled (nacho style) jalapeño I have ever had. If you like experimenting with mexican food at home, or if you have a semi-regular taco night, this recipe is for you. You just need some of the most basic pickling ingredients, 1 pound of jalapeño peppers, a few mason jars, and about 45 minutes time in total. The process timing can creep a bit if you're having wine while doing this, but it makes it that much more fun.

The following is copied and pasted without permission. So be sure to visit Simply Recipes as it is one of my favourite inspirational food blogs.

Ingredients

  • 1 lb jalapeño (and serrano if you wish) chile peppers
  • 1/3 cup olive oil
  • 2-3 medium white or yellow onions, thickly sliced
  • 2-3 medium carrots, peeled and thickly sliced
  • Florets from half a small cauliflower (optional)
  • 1 head garlic, cloves separated but not peeled
  • 4 cups apple cider vinegar
  • 2 Tbsp Kosher salt or sea salt
  • 2 bay leaves
  • 1/2 teaspoon dried oregano
  • 4 sprigs of fresh marjoram or 1/4 teaspoon dried
  • 4 sprigs of fresh thyme or 1/4 teaspoon dried
  • 1 Tbsp sugar

METHOD

1 Wash the chiles, leaving the stems intact. Cut a cross in the tip end of each chile so that the vinegar will be able to penetrate the chile.

2 Heat oil in a large, deep skillet. Add the chiles, onions, carrots, cauliflower if using, and garlic. Fry over medium heat for about 10 minutes, turning them over occasionally.

3 Add the vinegar, salt, herbs, and sugar and bring to a boil. Lower the heat and simmer for 5 minutes for serranos or 10 minutes for jalapeños. Make sure the chiles are entirely cooked through before canning.

4 Pack 4 pint-sized sterilized jars with the chiles and vegetables. Top with the vinegar and seal. Process in a hot water bath for 10 minutes.

Once opened, can keep for one to two months in the refrigerator.

Sunday, July 19, 2009

Jerk Chicken

prep time: 25 minutes

Marinate for: 12-16 hours
Grill: 2 hours

Marinade
1/2 cup fresh orange juice
1/2 cup fresh lime juice
8-10 scallions, chopped
3 habanero peppers
3-4 large garlic cloves, chopped
1 tbsp fresh thyme
1 tbsp ground allspice (grind the berries for best result)
1 tbsp kosher salt
2 tsp ground black pepper
1 tsp ground cinnamon (best to grind from a cinnamon stick)
1 tsp dry mustard
1/4 tsp grated nutmeg

3 pounds bone-in chicken (drumsticks and thighs)


1. Combine marinade ingredients in a food processor until you've got a good liquidy marinade.
2. Trim your chicken of any excess skin/fatty bits.
3. Place the chicken and marinade into a ziplock bag or other container (16 hours).
4. Set up your bbq (charcoal 2-zone fire is the best!) FOR AROUND 250 degrees.
5. Make sure you let your chicken sit out at room temp for about 1/2 hour or so so you aren't cooking cold chicken.
6. Cook the chicken over Indirect Low Heat (See this for information on grilling)
7. Simmer the reserved marinade to kill any raw chicken bacteria for about 1 minute.
8. Brush the chicken with marinade while grilling.
9. Let chicken rest for about 1/2 hour. It can be served the next day after refrigeration for even better results.


Sunday, May 10, 2009

Recession-Proof Eating : Braised Pork Belly


Good food doesn't have to take up much of your time or finances. You just have to know where to get your ingredients and create the right things that can be used in other recipes (which I like to call progressive meal planning) and also provide a satisfying experience at every step of the way.

For example, today we decided finally take advantage of Tom Collichio's {Braised Fresh "Bacon"} recipe which is included in his absolutely fantastic food lovers book titled 'Think Like a Chef'. The reasons to create this recipe were very evident, but the only one that triggered the the steps involved were the fact that it just looked KILLER. Other reasons included cheap ingredients and a surplus of byproducts like brown chicken stock.

Basically, we had to make white chicken stock, then brown chicken stock (which includes the white stock as an ingredient) and then slowly braise a pork belly. This entire process would take all day, but it was worth it for the smells alone.

I don't want to post every step here because I think you can get to this recipe if you already know how to make brown chicken stock. If you don't, the fundamentals can be found here, via google, or nearly any french or contemporary cookbook. I did follow Tom's recipe this time around since he was the inspiration for dinner.

The main reason that I wanted to post about this meal was because it only cost about 7 dollars worth of ingredients to make and a bit of time (and thyme). This meal will give about 2 days worth of meals for 2 people and also some extra brown stock to use in multiple recipes for the rest of the week.

Chinatown, which is the best place to get fundamental ingredients if you have access, supplied us with 2 lbs pork belly for $5 and also 6 chicken carcasses for $1 (for the white and brown stock). The rest was just simple ingredients that we've either grown like herbs, or come from our organic Bryson Farms weekly delivery.

So here is the recipe for the pork belly by the Top Chef. It's still braising in the oven and the smell is creating an incredible anticipation that can only be enjoyed by putting passion into creating meals.

from Chowhounds: http://www.chow.com/recipes/10762


GQ magazine voted this their favorite meat dish of the year, after strenuous debate over whether I should call it “fresh bacon” or “pork belly.” Whatever you want to call it, it is rich and delicious. When you buy pork belly, be sure to have the butcher leave the skin on.

INGREDIENTS
  • 1 tablespoon peanut oil
  • Kosher salt and freshly ground black pepper
  • 2 pounds pork belly, skin on
  • 1 onion, peeled and coarsely chopped
  • 2 carrots, peeled and coarsely chopped
  • 2 celery stalks, peeled and coarsely chopped
  • 1 leek, white part only, trimmed and chopped
  • 2 garlic cloves, peeled
  • About 3 cups brown chicken stock
INSTRUCTIONS
  1. Heat the oven to 350°F. Heat the oil in a large ovenproof skillet over medium heat until the oil slides easily across the pan. Salt and pepper the pork, and add it, fat side down, to the skillet. Cook until the skin is browned, about 15 minutes, then transfer the pork to a plate.
  2. Pour off all but about 2 tablespoons of fat and add the onion, carrots, celery, leek, and garlic to the skillet. Cook the vegetables, stirring occasionally, until they are tender and beginning to brown, about 20 minutes. Return the pork belly to the skillet, fat side up, and add about 2 cups of stock (it should surround but not cover the meat). Bring the stock to a simmer, then transfer the skillet to the oven. Gently simmer the pork, uncovered, for 1 hour, then add another cup of stock. Continue cooking until the pork is tender enough to cut with a fork, about 1 hour longer.
  3. Allow the pork to cool in the braising liquid. Remove the pork from the liquid, then gently lift off and discard the skin (use a small knife to separate any pieces that don’t come away from the fat easily). Score the fat, making crosshatch incisions, then cut the pork into 4 equal pieces.
  4. Turn up the oven to 400°F. Strain the braising liquid, discarding the solids. Return the liquid to the skillet, bring it to a simmer, and skim off the fat. Return pork, fat side up, to the skillet. Transfer the skillet to the oven and cook, without basting, until the pork is heated through and the fat nicely browned, about 20 minutes. Serve the pork in a shallow bowl moistened with a bit of the braising liquid.

Saturday, April 25, 2009

Awsome Potato Salad


My gorgeous wife, the love of my life, most babelicious babe of all time just made THE best potato salad ever.

Although not precise, here's what's in it:

5 medium Red potatoes - skins on, boiled until soft
1 cup Green beans - steamed and chopped
Corriander - handful, chopped
3 Green onions - chopped
1/2 red onion - finely diced
2 tbsp grainy mustard
1/2 green (or any other colour) chopped
1 tbsp horseradish
3 tbsp sour cream
2 tbsp ceasar dressing (Paul Newman's the best!)
Hot sauce - as much as you like (we used Marie Sharp's Belizian Heat)
season with salt, pepper and garlic power

POW!

Sunday, April 19, 2009

Date Balsamic Vinaigrette with Molasses


Last night I planned on making a blueberry balsamic vinaigrette until I discovered that my magic ratio wasn't possible without the Honey or the Blueberries that I thought we had. So, I went back to the fundamentals and substituted the honey with molasses for the sweet side. I had no other berries on hand and found a container of honey dates and decided to see what would happen if I pureed those.

The magic ratio is:

1 part berries (strawberries, blueberries, whateverberries)javascript:void(0)
1 part honey
1 part olive oil
1 part balsamic vinegar
a pinch of kosher salt
a tiny bit of grainy mustard

The newly discovered dressing was comprised of the following measurements:

1 tablespoon Molasses
1 tablespoon Olive Oil
1 tablespoon Balsamic Vinegar
2 Honey Dates
1/4 tbsp grainy mustard
kosher salt to taste (a pinch...yes a real pinch)
freshly ground pepper to taste

I pureed everything in a food processor and then moved everything to a bowl to finish mixing with a whip. That quantity is tough to really blend together in a food processor bowl or even a blender. More would work better.

The salad was built with fresh organic field greens, tomato, toasted pumpkin seeds, roasted sweet potato and red onion. This is a KILLER salad and dressing. Enjoy.

Thursday, March 26, 2009

Seared Scallops on Crustini with Bacon and Herbed Goat-cheese


This was a quick little meal invention that was inspired by a cookbook Ms.Huxtable was reading to pass the time at Chapters while I was shopping for french schoolbooks. Look for french recipes in the near future ;)


Serves 4

4 or 8 Bacon strips (depending on presentation, more bacon=more fun)
8 Sea Scallops (sliced into 2 for each)
1 crusty baguette
Herbed Goat cheese (such as Rondelé)
1 garlic clove
salt and pepper to taste
olive oil

Slice baguette on angle to create 4 long and thin (1/4 inch) angled slices from the baguette. The slices will be much crispier if they are thin. Brush each with Olive oil and broil in the oven, watching closely as they will turn from crusty to burnt in seconds. Remove from oven and allow to cool. Rub each with garlic clove and then spread herbed goat cheese as thick as you like.

Heat skillet on medium heat and fry bacon until desired crispness. Remove to paper towel for greasy soak-up and reserve the bacon fat in the pan. Add scallops to the hot pan and sautee each side for about 1 1/2 minutes. Scallops cook fast. Lay 3-4 scallop pieces on top of goat cheese. Place 1 to 2 strips of bacon on top and serve.

Sunday, March 15, 2009

Burger Grease Art

Saturday, March 14, 2009

Prime Rib Steak with Sweet Potato Fries and Garlic Aioli Sauce


The most enjoyable time of year for me is the reawakening of spring. When the snow is consistently melting and you can stand outside at 7 o'clock while the sun is still out with a t-shirt and a hoodie, you know it's time to BBQ. I got a bag of charcoal, some prime rib and went to work to make the greatest steak dinner that might challenge any restaurant of quality.

For the Prime Rib
1 or 2 nice pieces of prime rib steak (bone in!)
Kosher Salt
Ground Black Pepper


A half hour before you plan on grilling your prime rib, make sure that you take it out of the refrigerator and let it unchill. If your meat is cold, you'll have a harder time to get the perfect doneness that you desire. A rare steak shouldn't be raw, but it will be if you start grilling it cold.

Sprinkle salt on both sides of your steak and then grind some pepper all over. Brush a tiny bit of olive oil on both sides as well. It really helps get some black yummy char happening.

I've learned that pure charcoal is the way to go. Forget propane or natural gas grills. When you want a man steak, you sure as hell better know how to light a fire without any lighter fluid. Use a WEBER!

I cooked this steak for about 3-4 minutes per side on high heat.


Garlic Aioli
2 garlic cloves, chopped fine
1 egg yolk
kosher salt (to taste)
1/2 cup Extra Virgin Olive Oil
1/2 teaspoon dijon (grainy) mustard
1/4 tsp water
1/2 teaspoon Lemon juice


After a suggestion by MarcO, I went with a garlic Aioli sauce for the sweet potatoes. When I realized how much I made, I divided it into two batches and added about a tbsp of Horseradish to one and enjoyed it with the Prime rib. Inspired by classic roast beef of coarse.


Sweet Potato Fries
1 or 2 big sweet potatoes
4 cups water
2-3 tbsp kosher salt
2-3 tbsp brown sugar.


These made the meal. Simply peel a sweet potato or two, and cut into your favourite cut of fries. I went with the classic 1/4 inch fry size using a mandolin slicer. Soak the cut fries in a brine of salted water and brown sugar for about 1 hour or so.

Setup the deep fryer at 320 F and put the potatoes in for about 6 minutes. Remove and drain. It's ok to let them cool a bit, and it's encouraged. Crank the heat to 375 F and finish the potatoes off when you're letting your steak rest. They only need about 1 minute at this point. Keep an eye on them. If they need 20 more seconds, you'll know. If you let them go too long, they'll become too dark and too toasted.

Friday, February 06, 2009

Potage Velouté Aux Champignons

(Cream of Mushroom Soup)

An excellent lunch or light supper needs to be no more than a good soup, a salad, cheese and fruit. Combined according to your own taste, a good homemade soup despite access to ready made soup is almost a unique and always a satisfying experience. One of the most satisfying soups that everyone loves is the classic Cream of Mushroom Soup. This is my
favourite and classic french method inspired from the great french chef Julia Childs.

I put this together using Julia Childs "Mastering the Art of French Cooking", which was graciously given to Sharon and I from Ollie and Christine, and added a few words based on my own experience in making this delightful velvety soup (velouté...get it?). In fact, I put this together because I had to come up with an 'Exposé' or presentation to my French class and I wanted to be unique. So here is the version I wrote in English, of which I eventually translated into french so that I could present it to the class. It's in PDF format because I created it in PAGES. You'll need to install Adobe Reader if you don't already have it (but you most certainly should have this program in 2009).

Cream Of Mushroom Soup

Sunday, January 25, 2009


I don't think that there is a healthier or more satisfying meal than a meal from the sea. This weekend we jumped into the sea and grabbed a pound of PEI mussels for $2.99! Did you know that one portion is actually 1/4 pound? We doubled that for this meal, that just doesn't seem like enough of those little bastards.


Ingredients
  • 4 tsp olive oil
  • 1 small onion(s), chopped
  • 4 medium garlic clove(s), minced
  • 3 small tomato(es), plum, coarsely chopped
  • 1 cup(s) wine, dry white
  • 2 tsp parsley, flat-leaf, chopped
  • 1 tsp lemon peel
  • 1 pound(s) blue mussels (weight is without shells), scrubbed and debearded
Instructions
  1. Heat a very large pot.
  2. Swirl in oil, then add onion and garlic. Sauté until golden, then add tomatoes and cook until they start to break down.
  3. Add wine, half of parsley, and half of lemon zest and bring to a boil.
  4. Add mussels, reduce heat, cover and simmer until mussels open, 6 to 8 minutes (discard any mussels that don't open).
  5. Divide mussels and broth among 4 soup bowls. Serve, sprinkled with remaining parsley and lemon zest.

Saturday, January 17, 2009

Chicken and Bean Wrap

I'm a huge fan of the wrap. There are so many ways to combine ingredients to make a unique wrap everytime. A fresh quality tortilla is very important so make sure you buy your favourite. I used Presidents Choice Blue Menu whole wheat wraps for this meal.

Yields 4 wraps.

Ingredients:

4 whole wheat flour tortillas - medium or large
1/2 cup canned kidney beans (or black beans, pinto beans, small red beans)
boneless skinless chicken breast (about 1/2 pound or so)
1/4 cup cilantro, chopped
1/2 green or red bell pepper, diced
1 onion, diced
30 gm bold cheddar cheese, grated (optional)
1 tsp ground cumin
1 tsp ground chili powder
1/4 tsp cayenne
1/4 tsp oregano
salt and pepper to taste (approx 1/2-1 tsp kosher salt worked well)

  1. Flatten chicken breast with a meat pounder or rolling pin so it is an even thickeness. Season with salt and pepper. Heat up a skillet or non-stick pan to medium-high and add a little oil to help the chicken brown. Cook about 4-5 minutes per side. Remove from heat and rest.
  2. Dice up onion and bell pepper.

  3. Rinse Beans.
  4. Mince corriander.

  5. Dice chicken breast and add to beans, corriander, bell pepper, onion and seasonings. Mix well.

  6. Place about 1/2 cup or so of mixture onto a flour tortilla and add a bit of cheddar cheese.
  7. (optional) wrap tortilla in tin foil and place into a preheated 400 degree oven for about 20 minutes.
  8. serve with sour cream and sriracha chili sauce.

Tuesday, January 06, 2009

Thai Green Curry

Hello all! Monsieur bouche invited me to contribute here some time ago, but I dragged and dragged and dragged. So, as part of the list of new year promises I make and break for myself, I decided that I would try to get some recipes posted in 2009. I'll start by saying that I love spicy foods. (My wife and I both do!) We picked this recipe up while roaming around Thailand in 2007. Anyone who knows Thai food knows green curry, so let's get started.


To do this right, you're going to want the freshest ingredients you can find. Luckily, we have a local Asian market not too far away that has fresh produce that you can't find in most supermarkets. You can use whatever meat you want in the curry. We typically use shrimp or tofu, but chicken or beef work just as well. Here is the list of ingredients;

1 lb shrimp (uncooked and shelled)
6-8 Thai eggplants
A handful of green beans
1 cup of Thai basil leaves
2 kaffir lime leaves
a dash of fish sauce
1 tablespoon of sugar
1 small jar of green curry paste (2-4 tablespoons)
2 cans of coconut milk/cream
2 medium green chiles
4-6 small red chiles
a handful of Thai "peas"

I normally use a lot more chiles in the recipe than I've listed above. Adjust to your own taste. Also, I lost something called Thai "peas". I'm not sure exactly what these are, but they add a nice bitter touch to the dish and an interesting texture.


First of all, pour one can of coconut milk onto a large sauce pan or wok. I use a sauce pan because I don't have the gas stove, which I feel is important to cooking in a wok...but what the hell do I know? Fry on high for 5 or so minutes, or until the coconut milk seems to separate into an oil. (ok, this part I know, so pay attention)

Now add the curry paste. Making curry paste from scratch is a pain in the arse, so I typically buy the pre-made stuff. Next time I make the paste, I'll post that too. Oh, fry for about 2 more minutes, then add your shrimp, chicken, tofu, whatever.


Fry the meat until the shrimp turn opaque, then add 3/4 of the other can of coconut milk. Fry for 2-3 min, or until the coconut milk boils again. Now cut the eggplamt into bite-size pieces and add it to the mix with the beans, peas, and half of your red chiles finely chopped. It should look something like this:


Cook for another 5-8 minutes, or until the eggplant starts to soften. Remove the main stem from the kaffir lime leaves and chop those little bastards up! Now add your fish sauce, sugar, basil leaves and kaffir lime leaves and stir it in. Make sure the sugar melts and the leaves soften into the curry.


Ok, almost done.

I use a ladel made from a coconut just so it feels that much more authentic. At this point, your're basically done. Serve on a bed of rice (we prefer jasmine) and garnish with a couple basil leaves, some of those chopped green and red chiles, and a few drops of the leftover coconut milk. This is by far one of my favourite dishes, and it's really easy. ...impresses the guests every time!

Enjoy!

Foodeeze   © 2008. Template Recipes by Emporium Digital

TOP